A Library By Any Other Name…

by Jackie Houchin

Mention “Valentine’s Day,” and instantly visions of  cute or sentimental greeting cards, heart-shaped boxes of chocolates, and bouquets of red roses come to mind. You may even dream of romantic dinners or diamond bracelets.

But it was none of these things that Kristin Molloy of Mission Viejo, California, wished for last year for Valentine’s Day.

“I love books and libraries,” she said with a smile. “So do my kids. We love to go to our Mission Viejo library to check out books. Growing up, everyone in my family had a book to read around the dining room table. I wanted my own library!”

oaxze7-b88760174z.120160726144933000gjmhqss4.10
From left to right: Jenna Brown, Kaitlyn Schisler and Astha Parmar take a photo with the Little Free Library, a book kiosk at the Lake Forest Sports Park designed by the three from Cadette Girl Scout Troop 1859. Contractor Bradlee Rodecker helped in building the house-like kiosk.

Her husband, Kevin Molloy, a fireman, knew exactly what she meant. Earlier that year while visiting the Lake Forest Sports Park and Rec. Center they spotted an amazing tiny wooden library on a pole. Designed and built by three Girl Scouts with help from the Park staff, the cheery blue and white painted Little Free Library is a house-like box of books. Visible through two Plexiglas doors are perhaps 30-40 books for all ages. Anyone can take a book to read…free. After reading it, they can return it or bring back a different one. The organization’s motto is “Take a Book, Return a Book.”

Kristen thought her own Little Free Library would be great for their neighborhood.
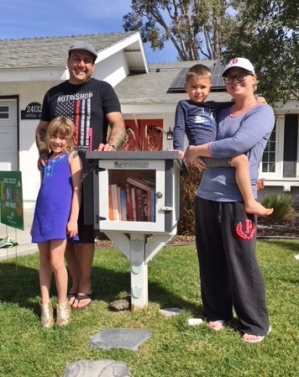
IMG_2702Kevin drew plans and constructed his Valentine’s Day gift, painting it to match their house. He checked with city regulations (though not all the Libraries I visited did) and sunk a post into their front lawn three feet from the side walk and about 24 inches from the ground. Three small flagstone steps invite kids to visit. He attached a mailbox flag which is extended when new books are added.

Kristin loved it!

(The height of the Libraries is a personal preference. I saw ones sitting on a base at 3 and 4 feet high.)

The family says they have quite a few kids & teens stopping to choose books on their way to/from a nearby park. The couple’s children, Georgia and Ryan, enjoy sharing their own books as well.

Check out the organization for information on buying or building your own library, and to see an amazing variety of Little Free Libraries, including some that look like a church, schoolhouse, caboose, or English telephone booth! https://littlefreelibrary.org/faqs/

Of course, right away, I had my hubby build a Little FREE Library for ME for THIS Valentine’s Day, and paint it to match our house. (I’ll let you know how it goes in a later post, if you are interested.)

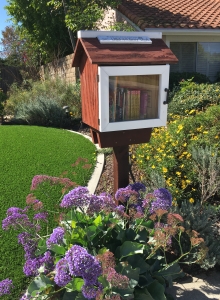
Other Little Free Libraries in Mission Viejo.
IMG_2676      IMG_2705


Now let me tell you about some other things to LOVE and to GIVE on February 14th, and these are especially meaningful to us writers of books.

I love a libraryThe 14th of February is also LIBRARY LOVERS DAY.

Here are some things you can do to celebrate:

  • Visit your local library and check out a book or film.
  • If you know someone who doesn’t have a library card, encourage/help them to get one.
  • Volunteer time at the library (shelving, tutoring, reading to kids), or donate money and/or a few of your books.

Without the library, you have no civilization.” ― Ray Bradbury

“Libraries really are wonderful. They’re better than bookshops, even. I mean bookshops make a profit on selling you books, but libraries just sit there lending you books quietly out of the goodness of their hearts.” ― Jo Walton

“The library is like a candy store where everything is free.” ― Jamie Ford

“Libraries made me – as a reader, as a writer, and as a human being.”  –Laurie R. King


book-giving-day-bookmark-original-copyThe 14th of February is also INTERNATIONAL BOOK GIVING DAY.

Here are some ways to participate:

  • Share your favorite book with a friend.
  • Give books as gifts to your own children or to those of friends.
  • Donate books to children’s libraries, schools or charities.
  • Leave books in places where they’ll be found, such as doctors’ waiting rooms, train or bus stations, or airports.

“Give a Book” is a UK based charity with the sole aim of giving books where they will be of particular benefit including prisons.  http://giveabook.org.uk/

“Give a Book” works with Ellie’s Friends, a charity who helps women who are recovering from Cancer. They send a monthly mixed selection of light reading to be enjoyed. Each bundle contains ten titles and is delivered to a different recipient each month.  https://elliesfriends.org

“Give a Book” also works with First Story, a registered charity which places published authors in schools to hold weekly workshops on creative writing. At the end of the program, the students’ pieces are published in their own anthology.  https://firststory.org.uk/

*****

4fe43936383d7abf9e1f87c045c5a3b2


TWEETABLES: 

What else can you do for your Sweetheart on February 14th? (Click to Tweet)

Library Lovers Day & International Book Giving Day share February 14 with Valentine’s Day. (Click to Tweet)

Creating Seasonal Articles*

Christmas sugar plumsby Jackie Houchin

Does reading all those December magazines with their holiday stories, recipes, tips, traditions, and inspirations make visions of sugar plums, er, I mean, ideas for articles to dance on your head?

“Oh dear! I so wanted to write an article about those fun games we play for identifying Grandma’s tag-less gifts under the tree!” (Family Circle Magazine?)

“And how I wished I’d shared my Mom’s Christmas fruitcake recipe from her recipe box (that I inherited this year when she died), and told all who read the article why they really should try fruitcake again.”  (Reminiscence Magazine?)

But, I forgot to write them.

And now it’s too late – WAY too late.

At least for this year.

But not for next year, if I plan ahead.  Many magazines need seasonal articles. But they need them long before the pub date. Articles with a “time-tag” are a good way for new writers to break into print (or seasoned writers to pick up some pocket money).

It’s all in the timing

Start by picking up Chase’s Calendar Of Events and look ahead to see what holidays will be celebrated in six months to a year. Or you can check the guidelines in the new The Writers Market Guide for specific publications you hope to write for.

Send a query letter with your idea ahead of the suggested time. If you get a go-ahead, be sure to deliver your article on time. And be patient. If it isn’t used in 2018, it may be held till 2019.

Low-profile holidays

Brain storm ideas for the less popular holidays, such as Arbor Day, Grandparents’ Day, Flag Day, Patriot Day, Friendship Day, Bastille Day, Poppy Day, or even…. Cookie Baking Day! (December 18)  Also think about back-to-school and summer vacation themes.

Your special “slant”

If those “sugar plum” ideas aren’t already dancing away up there, then:

  • Leaf through old magazines (yours or at the library).
  • Think about experiences you’ve had during holidays.
  • Write a short biography of a person linked to a holiday.
  • Research a holiday custom.
  • Remember anniversaries. (What happened 5, 10, 500 years ago?)
  • Interview a teacher, a parent, a coach, a Macy’s clerk.
  • Write a holiday short story or poem. (Some magazines are still open to them.)

Christmas funny poem

Before and After Tips

Start an idea folder with clipped articles from magazines or newspapers. Jot notes about ideas on each. Not all will be usable, but many will work. When you’re looking for a certain seasonal theme, these may trigger an idea.

After the original-rights sale, look for reprint markets for next season. Make a list of potential ones and their lead times, and keep your original article with them.

Open a new bank account!

Christmas bank accountJust kidding!  You won’t get rich from these sales, but you will get “writing clips.”  And when magazine editors discover your timely, well-written articles/stories etc., they will approach YOU with their needs.
Okay… do you need some ideas for NEXT Christmas?  Check out these:

  • Favorite Christmas books, movies, musicals/plays (pastiche or true likes)
  • Christmas mishaps (humorous, or coping skills)
  • Christmas trees: cutting your own, uniquely decorating (we knew friends who lit live candles on their tree!), a special nostalgia ornament
  • Family traditions (oldies, or how to start your own)
  • How to make homemade gifts (food, ornaments, clothes, home decor)
  • Holiday baking (how-to, tastes & smells, shipping)
  • Holiday traditions from other countries (foods, decorations, activities)
  • Or…. interview someone with over 3,500 Santa Claus decorations (Hint: I can give you her name.)

Take away

After all the gifts are opened, the holiday meal is eaten (and cleaned up), the kids are playing with new toys (or the boxes), and the older “boys” are watching football, go grab a piece of crumpled wrapping paper, smooth it out, flick open that new expensive gold-plated pen, and start writing up your holiday impressions, experiences, and ideas while they are still “dancing in your head.”

Christmas garland

Merry Christmas &  Happy New Year !


*Inspiration for this post came from Jewell Johnson’s article, Writing Seasonal Articles in the Christian Communicator, Nov-Dec, 2017.

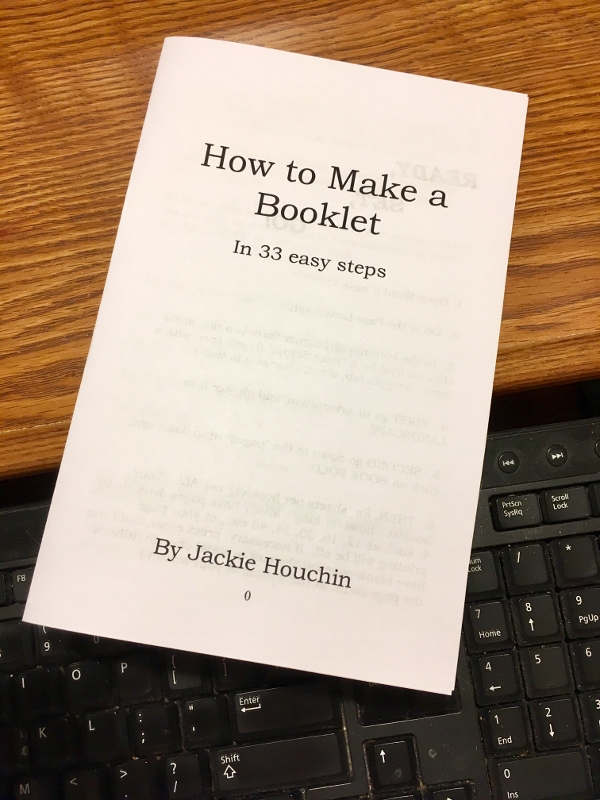
How to Make A Booklet in 33 “Easy” Steps

By Jackie Houchin.

This is a “How To?” post on making simple half sheet booklets. Booklets can be used for any project or advertisement. I use them to print out my MISSIONARY KIDS STORIES so some of the younger kids can have a “hands on” experience and be able to re-read the stories when Mom’s laptop is not available. These booklets are pretty simple to look at… and I hope I’ve made the instructions simple, but…you judge.  The problem is, there will be differences between PCs and Apple computers and laptops, and with the various aged or brand new software you are using.

I’m using Window 7 with MS Word 2007, and a mid-range Cannon Printer.

READY,

    SET,

         GO!


1. Open a new document in Word (I have 2007)

2.  Go to the Page Layout tab.

3.  In the bottom right corner there is a tiny arrow – click on that for a “Page Setup.” (It will open with a small Margins tab, if not, change it to that.)

Snip - Page Set Up

4.  FIRST go to ‘orientation’ and change it to LANDSCAPE.

5.  SECOND go down to the “pages” drop down and click on BOOK FOLD.

6.  THEN, for ‘sheets per booklet,’ use ALL. (Your booklet – however long – MUST have pages divisible by 4, such as 12, 16, 20, 24, 48 etc., or your page printing will be off.  If necessary, press enter, until you have blank pages at the end to equal enough. (Check the page count at the bottom of your screen.)

7.  NEXT  Set the INSIDE and OUTSIDE margins to .5″  Set the TOP and BOTTOM margins anywhere from .5″ to 1.0″ as desired for more or less white space.

8.  Leave O for the GUTTER if you plan to open the booklet flat and center staple it together, or sew it down the middle. If you plan to close your booklet and staple it along the left side, or use a spiral or squeeze binding, then set the GUTTER at .25″ or .5″ inch.

******

 9.  Still in the Page Setup box, go to the Layout tab.

Snip - Page Set up - PAge Layout

10.  Set the Section Start at “New Page.”

11.  Warning: DO NOT CHECK the box for “Different First Page.” Somehow it screws up the order of pages in printing.

12.  Set the headers & footers at .5″.

13.  The vertical alignment stays at “Top.”

14.  Click OK.

******

15.  You will see a vertical half page. Make this title page special, with fonts or photos.

16.  Start your work (or copy and paste from another document) on the following page.  You can change fonts and sizes, spacing and indents, add photos, clip-art, tables, charts,  etc., and change the style by using the Home settings. (For my stories, I use an easy-reader font and the block style of indents.)

Snip- Word home page

******

17.  To add page numbers, go to the Insert tab.

Snip - Header Footer Page Number

18.  Go to the Header & Footer square and click on Page Numbers. It will give you choices as to where you want the numbers placed. For a booklet, it’s best to place them at the center of either top or bottom. You can also “format” what they look like, and at what number you wish to start. Experiment with what you prefer. I start with #O since I don’t want the front cover to be page one.

19.  When you are finished,  MAKE SURE YOU HAVE A NUMBER OF PAGES DIVISIBLE BY FOUR, as per the page number on your screen, NOT on the document, even if you have to “enter” your cursor several times to get a few blank pages at the end.

******

NOTE: I am using a Cannon MG5500 Series Printer, so the following may differ with your machine. Use these as general instructions, and adjust for yours.

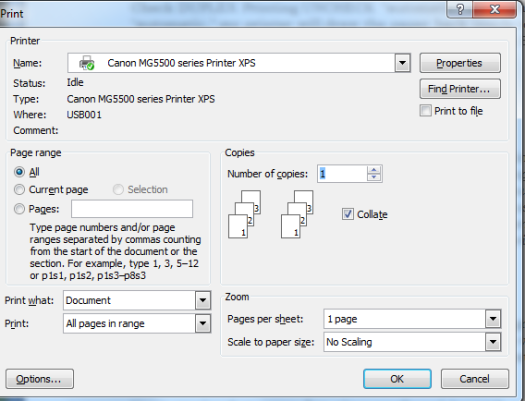
20.  Click on “print” (not quick print).

Snip - Print Screen

21.  When that window opens. Choose the number of copies you want to print (or experiment with one at first), and check “Collate.”

22.  Click on “Properties” (upper right corner of your print box).

Snip - Print - Properties - Page layout

23.  Go to the Page Setup Tab.

24.  Make sure LANDSCAPE Orientation is checked.

25.  Check DUPLEX Printing

26.  UN-CHECK “automatic” if it is checked. (With “automatic” checked, the printer will draw the paper back inside to print the opposite side before going on, but THIS DOES NOT WORK WITH A BOOKLET. The second side will be upside down.)

27.  Click on OK, then OK to print.

28.  The printer prints ONE side only, then stops. (It will look weird at first.)

29.  Take your printed pages out and re-insert them, according to how YOUR printer works.

Snip - Print again

With my printer (a front feeder), I keep the pages face up and just lower them down to the paper feed tray beneath the output.  I don’t turn them over or rotate them clockwise (like in this screenshot), STRAIGHT DOWN just as they came out of the printer (EVEN if my printer screen SAYS to rotate them, I don’t.  THAT works only for full page documents, NOT for booklets which are printed and compiled differently.) TEST yours first!

30.  Click “Start Printing” when prompted.

******

 31.  After the second side is printed, take the pages out, align the edges carefully and fold them in half crosswise to find the line where the staples or sewing will be placed. (Or crease them heavily in preparation for stapling or binding them along the left side.)

32.  Use a stapler that opens flat, place cardboard or wood beneath and staple two or three places, with the inside pages of your booklet facing down.

33.  Open and carefully bend the staple ends tight. Fold and crease tightly.


AND…

    VOILA!

         A BOOKLET!


Megan reading Dead Mice

Megan reading MK Story #1 – “Dead Mice”