

By Jackie Houchin.
This is a “How To?” post on making simple half sheet booklets. Booklets can be used for any project or advertisement. I use them to print out my MISSIONARY KIDS STORIES so some of the younger kids can have a “hands on” experience and be able to re-read the stories when Mom’s laptop is not available. These booklets are pretty simple to look at… and I hope I’ve made the instructions simple, but…you judge. The problem is, there will be differences between PCs and Apple computers and laptops, and with the various aged or brand new software you are using.
I’m using Window 7 with MS Word 2007, and a mid-range Cannon Printer.
READY,
SET,
GO!
1. Open a new document in Word (I have 2007)
2. Go to the Page Layout tab.
3. In the bottom right corner there is a tiny arrow – click on that for a “Page Setup.” (It will open with a small Margins tab, if not, change it to that.)

4. FIRST go to ‘orientation’ and change it to LANDSCAPE.
5. SECOND go down to the “pages” drop down and click on BOOK FOLD.
6. THEN, for ‘sheets per booklet,’ use ALL. (Your booklet – however long – MUST have pages divisible by 4, such as 12, 16, 20, 24, 48 etc., or your page printing will be off. If necessary, press enter, until you have blank pages at the end to equal enough. (Check the page count at the bottom of your screen.)
7. NEXT Set the INSIDE and OUTSIDE margins to .5″ Set the TOP and BOTTOM margins anywhere from .5″ to 1.0″ as desired for more or less white space.
8. Leave O for the GUTTER if you plan to open the booklet flat and center staple it together, or sew it down the middle. If you plan to close your booklet and staple it along the left side, or use a spiral or squeeze binding, then set the GUTTER at .25″ or .5″ inch.
******
9. Still in the Page Setup box, go to the Layout tab.
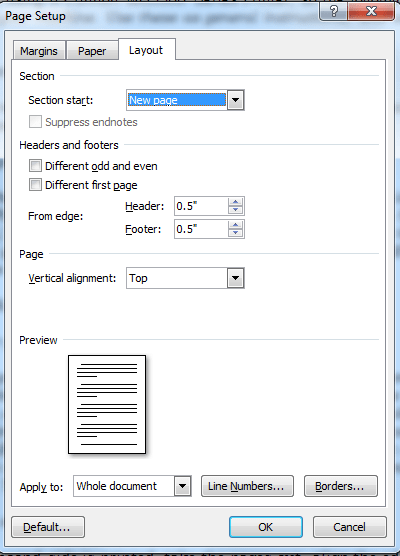
10. Set the Section Start at “New Page.”
11. Warning: DO NOT CHECK the box for “Different First Page.” Somehow it screws up the order of pages in printing.
12. Set the headers & footers at .5″.
13. The vertical alignment stays at “Top.”
14. Click OK.
******
15. You will see a vertical half page. Make this title page special, with fonts or photos.
16. Start your work (or copy and paste from another document) on the following page. You can change fonts and sizes, spacing and indents, add photos, clip-art, tables, charts, etc., and change the style by using the Home settings. (For my stories, I use an easy-reader font and the block style of indents.)

******
17. To add page numbers, go to the Insert tab.

18. Go to the Header & Footer square and click on Page Numbers. It will give you choices as to where you want the numbers placed. For a booklet, it’s best to place them at the center of either top or bottom. You can also “format” what they look like, and at what number you wish to start. Experiment with what you prefer. I start with #O since I don’t want the front cover to be page one.
19. When you are finished, MAKE SURE YOU HAVE A NUMBER OF PAGES DIVISIBLE BY FOUR, as per the page number on your screen, NOT on the document, even if you have to “enter” your cursor several times to get a few blank pages at the end.
******
NOTE: I am using a Cannon MG5500 Series Printer, so the following may differ with your machine. Use these as general instructions, and adjust for yours.
20. Click on “print” (not quick print).

21. When that window opens. Choose the number of copies you want to print (or experiment with one at first), and check “Collate.”
22. Click on “Properties” (upper right corner of your print box).

23. Go to the Page Setup Tab.
24. Make sure LANDSCAPE Orientation is checked.
25. Check DUPLEX Printing
26. UN-CHECK “automatic” if it is checked. (With “automatic” checked, the printer will draw the paper back inside to print the opposite side before going on, but THIS DOES NOT WORK WITH A BOOKLET. The second side will be upside down.)
27. Click on OK, then OK to print.
28. The printer prints ONE side only, then stops. (It will look weird at first.)
29. Take your printed pages out and re-insert them, according to how YOUR printer works.

With my printer (a front feeder), I keep the pages face up and just lower them down to the paper feed tray beneath the output. I don’t turn them over or rotate them clockwise (like in this screenshot), STRAIGHT DOWN just as they came out of the printer (EVEN if my printer screen SAYS to rotate them, I don’t. THAT works only for full page documents, NOT for booklets which are printed and compiled differently.) TEST yours first!
30. Click “Start Printing” when prompted.
******
31. After the second side is printed, take the pages out, align the edges carefully and fold them in half crosswise to find the line where the staples or sewing will be placed. (Or crease them heavily in preparation for stapling or binding them along the left side.)
32. Use a stapler that opens flat, place cardboard or wood beneath and staple two or three places, with the inside pages of your booklet facing down.
33. Open and carefully bend the staple ends tight. Fold and crease tightly.
AND…
VOILA!
A BOOKLET!

Megan reading MK Story #1 – “Dead Mice”


You must be logged in to post a comment.