How to create a Zoom/YouTube series and make it work…correctly, Part 1

By Will Zeilinger and Janet Elizabeth Lynn

We are a husband and wife writing team who write individually, as well as co-write several books. We were shocked and confused, like many of our fellow authors when the pandemic hit.

Because the nation was given the “stay at home” orders at the onset of the pandemic, all live meetings, in-person book signings and book launches, speaking engagements and appearances in panel discussions came to an abrupt halt.  As writers, our marketing and promotion plans were put on hold.

One day we saw a YouTube interview with a musician that was recorded via Zoom, the online video meeting app. The interviewer and guest were shown side by side on the screen. After we watched several different examples of these YouTube interview videos, we had a brainstorm… why not conduct our interviews via Zoom on our computer?  We learned that doing this was not complicated at all. The result was our YouTube channel, “Chatting with Authors.” We interview authors of all genres about their work and life outside writing.

This is part one of a two-part series that discusses the ins and outs of making it work and tips on how to avoid some of the pitfalls.

What was needed:

(1) YouTube account (free) Go to YouTube.com and sign on. 

(2) Zoom account (free) Go to Zoom.com and sign up. 

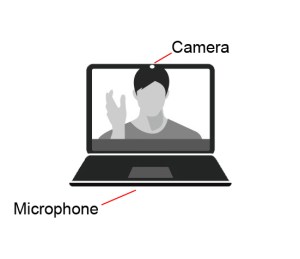
(3) Computer (laptop/notebook, desktop, or tablet) with a built-in camera and microphone.  


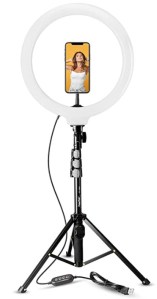
(Some people use their smartphones on a stand with a “ring light,”  but it can be very difficult to monitor what is happening when the screen is small and far away from you.)


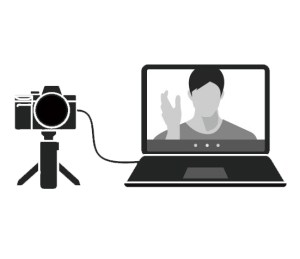
If you do not have a built-in camera, you may be able to connect a DSLR (digital reflex camera) to your computer. Ask for help from a tech-savvy friend if this is getting too complicated


(4) Make sure you have good lighting. Use a couple of lights (position them on either side of your computer.) They don’t have to be fancy lights, even table lamps will work. (Try not to sit with a window behind you.)


(5) A pleasant, but not distracting, room for your background.  If you don’t have a suitable space, try a solid, blank wall. Zoom provides digital backgrounds or you can use your own. 


 If you don’t have one, purchase “greenscreen” fabric on-line.


(6) A good Internet connection.

(7) Decide how long your interview will be (30 minutes, 1 hour, or longer) then schedule a meeting with your guest and be sure to set record while you chat on Zoom. When you are finished, upload your program to YouTube and tell your audience about it. That’s all there is to it.

(8) An opening title graphic or photo. You can create one yourself, use a template (available online,) or have someone create one for you…as well as a sign off.

(9) Before you decide to “go live” with your YouTube program, do a few “test interviews” and upload them to YouTube. You may delete them after you’ve viewed them. When you are satisfied with the lighting, background, clothing, hair (and make-up), and running time, you are ready to do your first interview.


(Continued next week with Part 2)


(Posted for Will & Janet by Photojaq)

My Tried (and sometimes True) Interview Techniques

Last time, I wrote about where I got my ideas for the articles and profiles I write. I started out by getting the assignments from my editor.

Then I began seeing possibilities for my own stories everywhere i.e. in Starbucks, at bookstores, or on the street. I followed up on referrals from friends and information I found in newspapers, newsletters, or around my neighborhood. I let my curiosity lead me to hobbyists, collectors, and folks with unusual occupations.

So many people: so many interesting stories! Next I needed to to pick their brains, pry out their deepest secrets, find out how and why they do what they do! I had to interview them.

There are three main steps (or methods to my madness) in how I interview folks.

Before the interview

I first decide why I want to interview the person, what I hope to learn, what kind of story I want to write. (A lot of this will depend on where I hope to place or sell the story.) Will it be informative, inspiring, promotional, or…simply someone I personally want to know more about. (Having my own News & Reviews website, helps with that last one.)

I contact the person (on the spot or by phone) and set up a time and date. I let them know who I am, who I write for, and the general topic I want to cover.

Then I do a little research on the person or their specialty, occupation or craft. From my “research” I make a list of questions I want to ask.

I make sure I have a notebook, pens, MY CAMERA, and a tape recorder if it’s going to be a fact-heavy interview. (Fresh or recharged batteries are a given, of course)

During the Interview

I try to establish a conversational mood by commenting or complimenting (depending on where we meet) on our surroundings. I thank them for letting me interview them, tell them what I hope to write about, and get a bit of basic info from them (correct spelling of name, title if any, etc.)

Then I pick up my notebook and pen, turn on the recorder if using it, and dig right in with the first (and easiest) questions. I never stick strictly to my written questions. If something more interesting (or tantalizing) comes up in their answers, I will follow it like a vein of silver in a Colorado mine. And – confession-time here – sometimes I will ask a question I have no intention of using in my story, just because I want to know.

I mostly listen and add questions as promptings to keep them talking. I smile and encourage them with nods or soft, sympathetic sounds. I haven’t mastered the “silence strategy” yet, but I’m told that if you can simply remain silent, your subject will begin to fill it with more info. It’s usually too uncomfortable for me to do that.

I take “off the record” seriously and will never write something I’m asked not to. That doesn’t mean I don’t want to hear it, however. Secret confessions sometimes help me to understand where the person is coming from. I’ll take notes, and I might use the revelation to shade or slant the story, but not even that, if it is too sensitive.

If I get behind on my note taking, I ask them to repeat, slow down, or clarify what they said, especially if I plan to quote it in the story. (Quotes must be 100% accurate!) If they are showing me objects they’ve collected or made, I will ask if I can photograph them. Always at the end of the interview I will get several shots of them with something meaningful to the story. (Projects, pets, creations, gardens, workplace, etc.)

When the interview is winding down, I quickly look over my questions to see if I got everything I need, then I’ll ask if they want to tell me anything I didn’t ask about. (Great stuff sometimes comes out this way.)

I thank them, give them my card with contact info, and offer to send them a hard copy of the finished story (or the link, if it appears in an online magazine).

After the Interview

I review my notes (it’s easier to decipher my scribbling if I do this right away), underlining key words and looking for a really cool approach to the story. I also try to come up with a good strong opening statement – whether it’s dramatic, provocative, humorous, or teasing. What I want is something that will suck in the reader. Wait, that’s called a “hook” right?

I also look for facts that I might need clarified or explained. If I find any, I’ll do a brief call-back by phone.

And, the rule is to never show the interviewee the piece before it is published. But on occasion, under special circumstances, I have been known to do that.

(I’m such a softie!)

Next time: How I Edit or “Weight-watching for Writers”

%d bloggers like this: